current location:Home > Service & Support > Installation instructions
For safety, please use aluminum wheels correctly
When assembling, you must read the operation manual carefully, take it out at any time if necessary, and keep it properly.
Familiar with wheel size, OUTSET and INSET values, number of mounting holes, P.C.D, P.C.D bolt hole diameter, center bore diameter, etc.
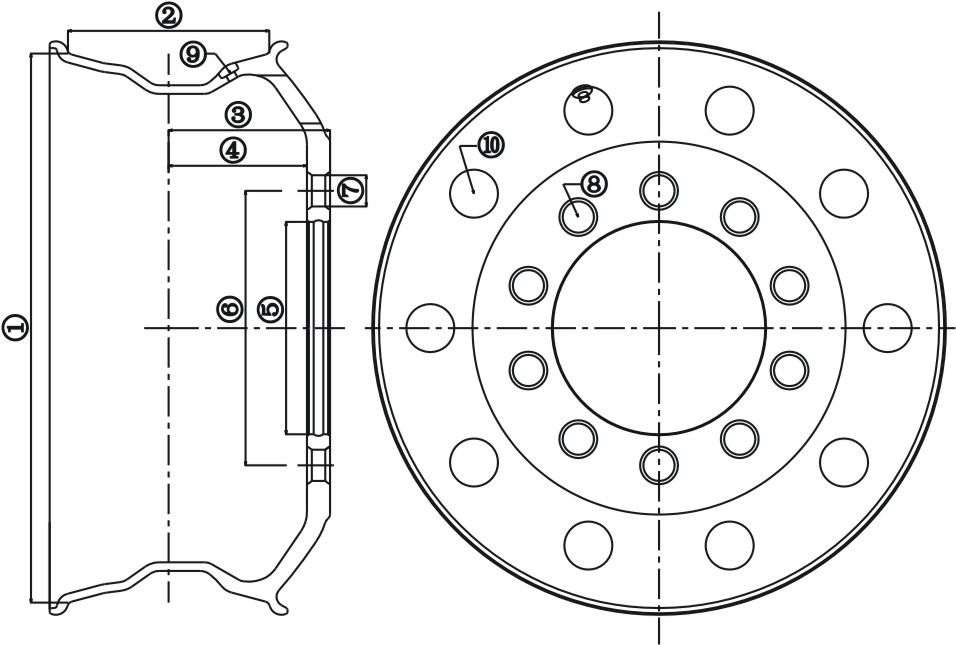
Confirm whether the size of the wheel hub, PCD, ET value, center hole, etc. are suitable for the assembly of the vehicle. Also confirm whether the size of the wheel hub and tire size are appropriate, and whether the nozzle and the nozzle hole of the hub are appropriate.
Note that please select the same size and the same type of wheels for the same car model, do not mix different wheels, so as not to damage the safety of operation.
Please choose the same wheel hub with the same model number, same size and same variety. Do not mix different wheel hubs to avoid damaging the safety of operation.
1.Confirm to remove the valve cap and install the valve as shown in Figure 1.
2. Note that when the turning point of the valve is about to reach the valve hole, the valve should be tilted slowly, as shown in Figure 2, through the valve hole, and at the same time, the side containing the valve core through ⑩ (window) until the other section of the valve is completely stuck in the valve hole, as shown in Figure 3
3. Confirm to put on the hexagonal nut from the side containing the valve core, pay attention to the direction of the nut, as shown in Figure 4, and go through the figure until the nut is stuck to the hub, and tighten the nut with a wrench to cover the valve cap.
1. The product must be confirmed before the tire is assembled. The product after the tire assembly may become unusable and require compensation, so be very careful.
2. Danger: When assembling the rim of the tire and the wheel hub, the shape of the rim should be assembled with the correct rim method (positive or reversed), and check whether the wheel is clamped, as shown in Figure 5. In order to protect the surface of the wheel hub from pinching or bruising and prevent damage to the tire skin, apply lubricating fluid to the tire and the mounting groove of the wheel hub. Wrong operation is the cause of personal accident.
3. Danger: Put one side of the tire on the clamp of the wheel hub, hold the tire with your hand, rotate the tire in a clockwise direction, let one side of the tire enter the wheel hub, when the tire is about to rotate to a full circle, remove the clamp, as shown in the figure 6. Pay attention to the protection of the hub surface when taking the fixture. Then continue to rotate until all the tires enter the rim, and then pull the hook out of the tire. Wrong operation is the cause of personal accident.
4. Attention: Please note that you must check the air pressure point before driving, because the air pressure is not enough to cause the impact to become smaller, which is the reason for the damage to the tire hub.
5. Note (after assembling the tire on the wheel hub), the balance of all the wheel hubs must be adjusted. Poor balance is the cause of abnormal vibration and wear and tear on the outside of the tire.
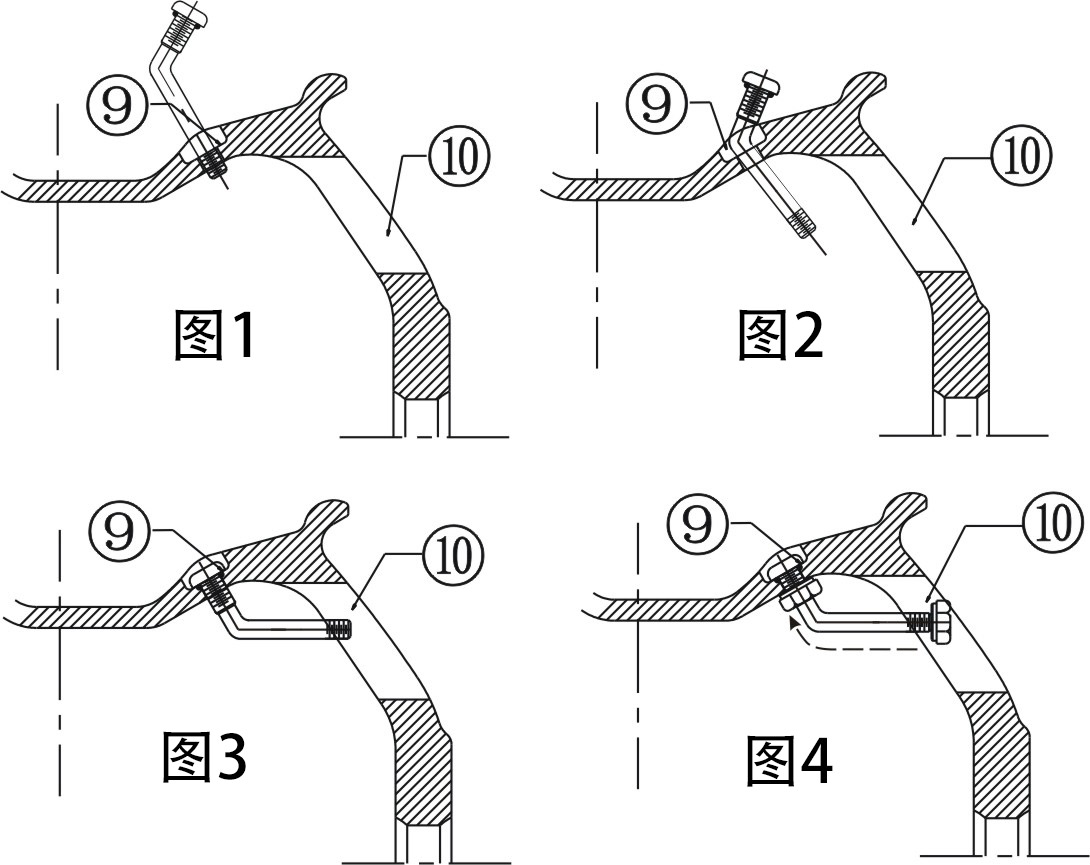
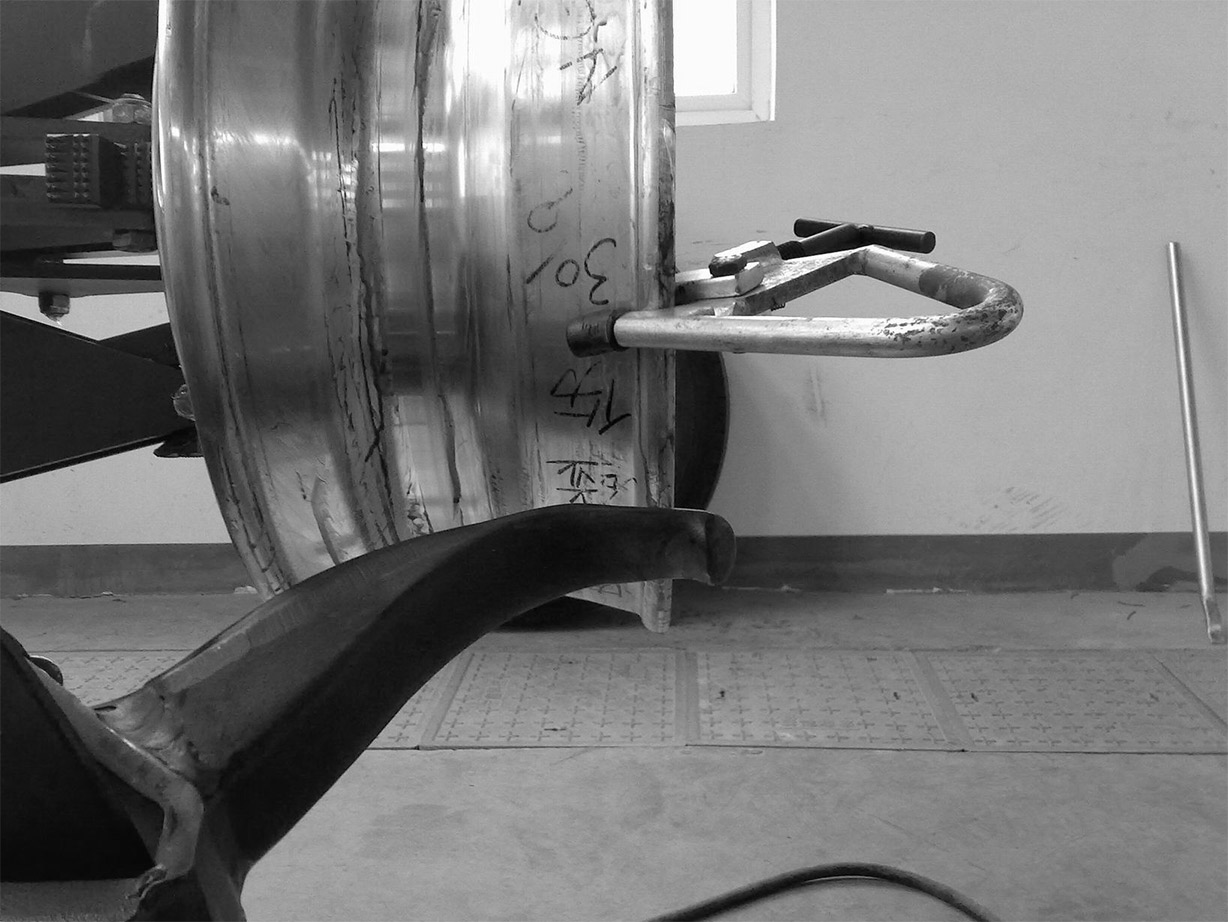
Figure 5
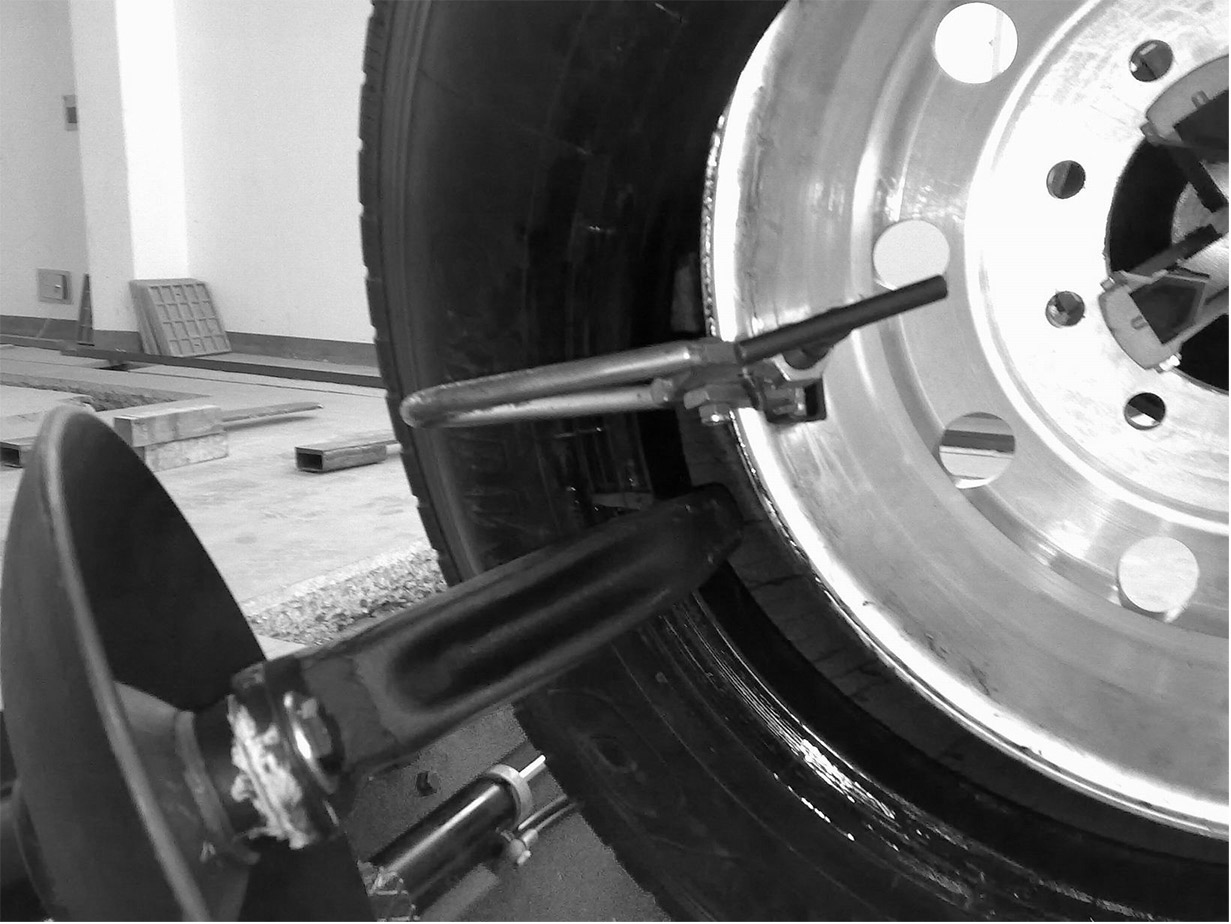
Figure 6
1. Pay attention to choosing the right bolts, the bolts should not be too long.
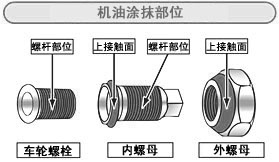
2. Confirm to lubricate the screw part of the bolt/nut. Apply a thin layer of lubricant such as engine oil to the screw part and head contact surface of the bolt/nut, as shown in the figure 7
Warning: Do not use lubricating oil or grease containing molybdenum disulfide. Otherwise, it is easy to cause excessive tightening and cause the wheel bolts to break.
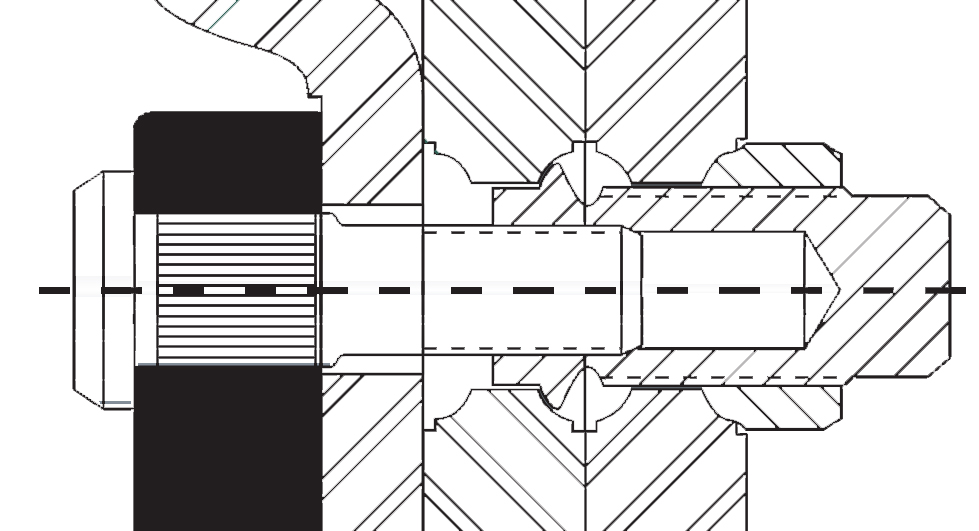
3.Confirm the assembly of the bolts. Assemble a single bolt as shown in Figure 8. The place where the bolt has no thread should not touch the place with the thread.
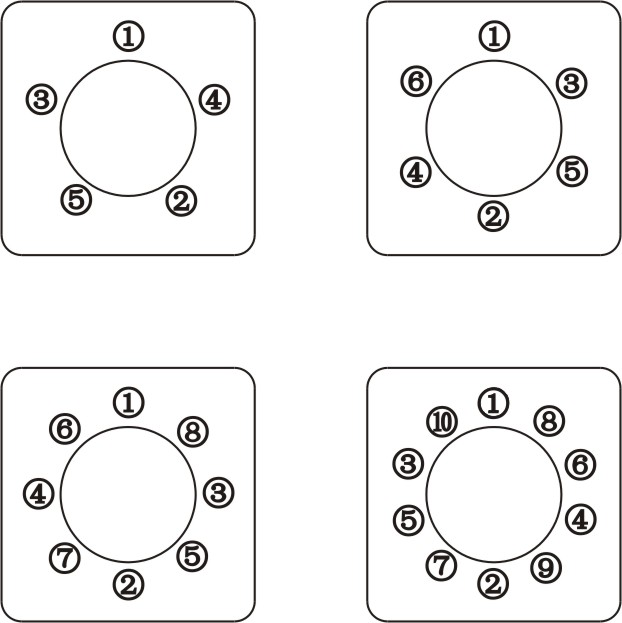
4.Note that locking the wheel nuts needs to be done diagonally in 2 to 3 times, and finally tighten with a torque wrench to the specified torque. As shown in Figure 9, the locking torque is applicable to 8-bolt-fastened wheels (JIS method) . As shown in Figure 10, five-bolt, six-bolt, ten-bolt or other types of wheels are assembled in the diagonal order. Please follow the torque specified in the vehicle user manual. If you use an impact wrench to lock, you need to pay full attention to the adjustment and locking time of the air pressure regulator, and avoid excessive locking. Finally, tighten it with a torque wrench to the specified torque.
5.Confirm that the wheel nuts are tightened again. After a period of initial running-in after installation, the tightening force will decrease. So please tighten the wheel nut again after installing the wheel and driving 50~100km.
6. Note that after the vehicle is assembled, garbage and foreign objects attached to the surface of the wheel hub must be removed. Due to the lack of tightness between the washers and bolts during assembly, the nuts and bolts are loosened and damaged. Therefore, the installation of the hub must be checked again.

1. Warning: During driving, if the driving is unstable, oscillates abnormally, or feels abnormal sound, please quickly drive to a safe place to check the state of the tires, the looseness of the bolts, the deformation of the wheel hub, the surroundings of the feet, etc., if any abnormalities are found , Please stop using.
2. Pay attention to the unevenness of the road and the deformation of the hub due to the friction of stones and stones on the hub, etc., so be very careful.
1. Note that due to the use of the car washing machine, the wheel hub may be damaged and discolored, so please use a soft cloth to clean it.
2. Confirm that because the wheel hub is attached with dirt and dust, it needs to be scrubbed frequently and carefully to make the wheel hub beautiful. Please do not use brushes, detergents, etc. when washing, otherwise the wheel hub will be damaged or corroded. When storing the wheel, do not place it in a place subject to direct sunlight, rain, oil, high temperature and humidity. Also, when installing the vehicle again, make sure that the air pressure is balanced.
The company will always be a strong backing for our products, and strive to ensure that there is no quality problem in the warehouse. We warmly welcome everyone to point out our faults and how to improve our product quality and service opinions and suggestions.